Introduction to the Use of VIP™ for Image Processing Education
version 1.3
About This Document
This document is meant as a short introduction to the VIP/IDL application suite from Research Systems, Inc. This introduction should provide basic documentation of the features of VIP used for intoductory image processing education (in this case, 55:148 Digital Image Processing at the University of Iowa). While not all of the features are covered, those used regularly for in-class demonstration/experimentation and those necessary for assigned homework are covered. If you would like something else covered or explained, please email the TA.
Overview
- VIP is the Visual IDL Programming environment
- allows access to IDL computing environment without knowledge of IDL syntax
- hundreds of built-in functions available including reading, processing, displaying, and writing of many image formats
- by manipulating a set of Nodes, one may produce a data flow diagram which is representative of a real program and then execute that program
- VIP provides a means of learning, rapid prototyping, and testing
- note: later in the semester, VIP may come in handy when trying ideas or converting images after we switch to the programming portion of the class
Typographical Conventions
Bold type is used to represent menu items and options
Bold Italic type is used to represent node names
Courier type is used to represent items which you must enter
Before you Begin
Please create a diphome directory in your home account (h: on the Windows NT machines). Place all *.vip projects and images in this directory. This will allow us to create examples that require little to no modification for distribution in class.
Starting VIP
Select Start->Programs->Engineering Software->Research Systems VIP 1.3->VIP+IDL
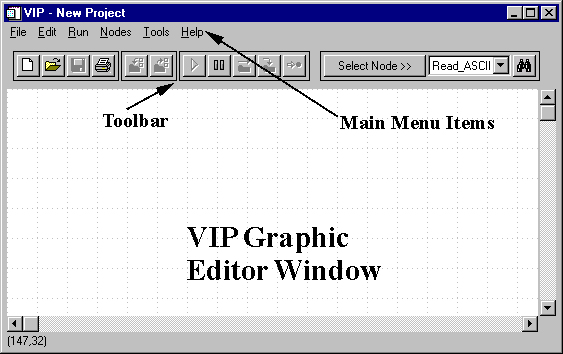
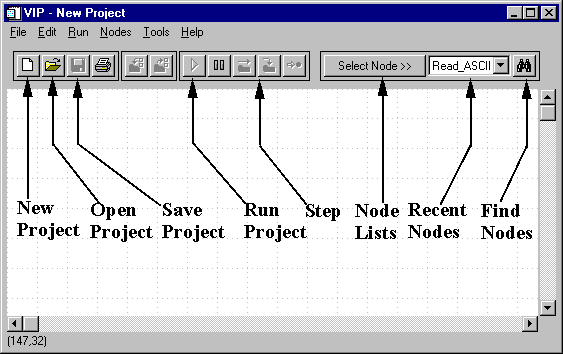
The VIP Interface
Starting a New Project
Select File->New (optionally, select the New Document button from the toolbar)
IF the current project is has not yet been saved, VIP will ask whether or not to save the current project before starting a new one.
Opening an Existing Project
Select File->Open->Project (optionally, select the Open Document button from the toolbar)
You are prompted with a file selection dialog. Use the filter to search a specific directory. To open a file, either double-click on the file, or enter its name in the selection field.
Saving a Project
Select File->Save (optionally, select the Save button from the toolbar)
Select this option to save the current contents of the VIP Graphic Editor Window as a VIP project file. If the file has not yet been saved, you will be prompted for a file name. The file will be saved as *.vip, where * is the name you specified.
Executing Projects
Run
Select Run->Run (optionally, select the Run button from the toolbar (looks like a play button on a tape player) )
Step Over
Select Run->Step Over (optionally, select the Step Over button from the toolbar)
Reset
Select Run->Reset (optionally, select the Reset button from the toolbar (looks like a pause button on a tape player) )
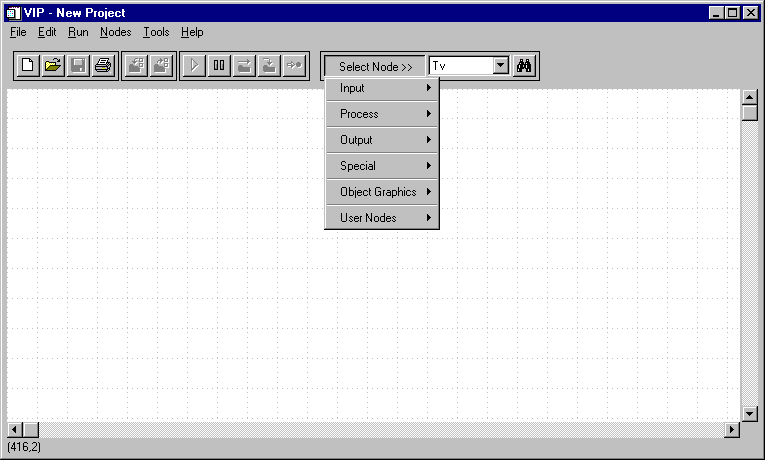
The Elements of Programming: The Nodes Menu
Nodes are the primitive building blocks for programming in VIP. All nodes in VIP fall into six groups: Input, Process, Output, Object Graphics, and User Nodes. In this class, we will be primarily concerned with three of the six: Input, Process, and Output.
Nodes can be selected through Nodes menu ( optionally, the Select Node button on the toolbar may be used).
Users may also search for nodes using the Find Node button on the toolbar (looks like binoculars)
Recently used nodes will remain strored in the box between the Select Node and Find Node buttons. If you need repeated copies of a node, this makes the task a little easier.
Input Nodes
Prefix of READ_* allow user to read data from a file, in our case images. The node we will most commonly use for this class will be READ_IMAGE. This node allows the reading of multiple image formats (although there are certain issues regarding their properties which will have to be discovered over time).
Can also generate data interactively using Make_Data node.
Process Nodes
There are seven groups of process nodes:
- Operator
- Array
- Manipulation
- Numerical Analysis
- Image Processing
- Signal Processing
- 3D Analysis
- Duplicator
Obviously, we will deal primarily with Image Processing nodes in this course, although we will also need Operators, Signal Processing nodes, and others to round out our projects.
Output Nodes
The following types of output are supported by VIP:
- To File
- To Text Window
- To Graphic Window
- Write_IDLvar
For this course, we will primarily deal with output To Graphic Window. however output To File may be of use later in the semester for performing image conversions (useful when web pages are to be made documenting homework).
Within the ouput To Graphic Window choice, there are again many options. We will make use of two of these:
- Plot: generates a plot of data. Use the Input Mux of the node to define how and what is plotted.
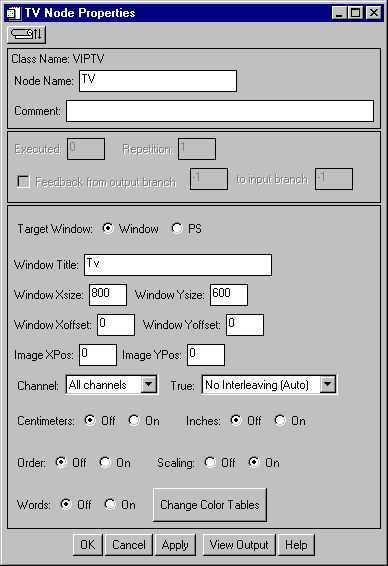
- TV: as its name implies, this node simply outputs and image to the screen.
- to display multiple images in one TV, specify the Window XSize, Window YSize, Image XPos, and Image YPos to place the multiple images in the window.
- OR, use multiple TV's - in order to do this, change the Window Title field in the node properties such that each TV has its own title
- another note: if an image looks questionable, try turning the TV's Scaling property on/off
Working with Nodes
Defining Node Properties
To change a node's properties, right-click the node and select Properties from the resulting menu. A dialog box will open with the adjustable parameters visible. This box will also contain a Help button with schematic of the node, its behavior, and useful information regarding its inputs and outputs.
Connecting Nodes
Nodes may be connected by double-clicking on the source node and single-clicking on the destination node (note: the click must fall near the node icon)
Removing Connections
To remove a connection, right-click on the connection you want to remove and select Delete from the menu that appears
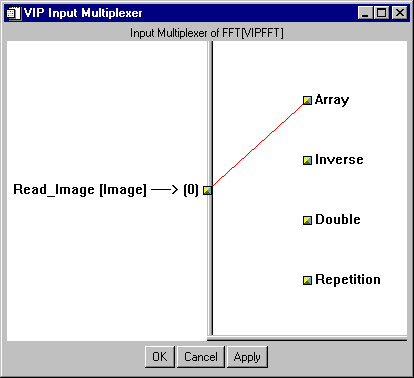
Input Mux
Some nodes have multiple inputs. Right-click the node and select Input Mux to see the routing of data to these inputs. If you receive an error, check here to be sure you are passing the correct things to the node.
Output Mux
Similarly, some nodes have multiple outputs. Right-click the node and select Output Mux to see the routing of data from these outputs. If you receive an error, check here to be sure you are passing the correct things from the node.
Examples of Completed Projects
Simple to moderately complex project files may be downloaded and examined from the introductory lecture page from the Digital Image Processing web page at the University of Iowa. Feel free to download and expriment with these project files. The respective image processing functionality is also touched upon on the page.
Online Help
The Help menu option and the Help buttons available in node property boxes contain detailed descriptions of the functions available.
Trademarks
VIP™ = Visual IDL Programming. Trademark of Intersys, Inc.
IDL® = Interactive Data Language, Trademark of Research Systems, Inc.
Last Updated: Tuesday, August 29, 2000 10:04 AM
By: Mark Olszewski