55:148 Digital Image Processing
Chapter 4, Part I
Image Pre-processing: Pixel brightness transformations
Related Reading
Sections from Chapter 4 according to the WWW Syllabus.
Chapter 4.1 Overview:
-
Pre-processing is a common name for operations with images at the lowest
level of abstraction -- both input and output are intensity images.
-
The aim of pre-processing is an improvement of the image data that suppresses
unwanted distortions or enhances some image features important for further
processing.
-
Four categories of image pre-processing methods according to the size of
the pixel neighborhood that is used for the calculation of a new pixel
brightness:
-
pixel brightness transformations,
-
geometric transformations,
-
pre-processing methods that use a local neighborhood of the processed pixel,
and
-
image restoration that requires knowledge about the entire image.
-
Other classifications of image pre-processing methods exist.
-
Image pre-processing methods use the considerable redundancy in images.
-
Neighboring pixels corresponding to one object in real images have essentially
the same or similar brightness value.
-
Thus, distorted pixel can often be restored as an average value of neighboring
pixels.
-
Do you remember the example of filtering impulse noise?
-
If pre-processing aims to correct some degradation in the image, the nature
of a priori information is important:
-
knowledge about the nature of the degradation; only very general properties
of the degradation are assumed.
-
knowledge about the properties of the image acquisition device, and conditions
under which the image was obtained. The nature of noise (usually its spectral
characteristics) is sometimes known.
-
knowledge about objects that are searched for in the image, which may simplify
the pre-processing very considerably.
-
If knowledge about objects is not available in advance it can be estimated
during the processing.
Pixel brightness transformations
-
Brightness transformations modify pixel brightness -- the transformation
depends on the properties of a pixel itself.
-
Brightness corrections
- Gray scale transformations.
-
Brightness correction
-
considers original brightness
-
pixel position in the image.
-
Gray scale transformations
-
change brightness without regard to position in the image.
Position dependent brightness
correction
-
Ideally, the sensitivity of image acquisition and digitization devices
should not depend on position in the image, but this assumption is not
valid in many practical cases.
-
Sources of degradation.
-
Uneven sensitivity of light sensors
-
Uneven object illumination
-
Systematic degradation can be suppressed by brightness correction.
-
Let a multiplicative error coefficient e(i,j) describe the change from
the ideal identity transfer function;
-
g(i,j) is the original undegraded image (or desired image)
-
f(i,j) is the image containing degradation.

- If a reference image g(i,j) is known (e.g., constant brightness c) then
-
the degraded result is fc(i,j)
-
systematic brightness errors can be suppressed:

-
Image degradation process must be stable,
-
the device should be calibrated time to time (find error coefficients e(i,j))
-
This method implicitly assumes linearity of the transformation, which is
not true in reality as the brightness scale is limited into some interval.
-
overflow is possible
-
the best reference image has brightness that is far enough from both limits.
-
If the gray scale has 256 brightnesses the ideal image has constant brightness
value 128.
-
Most TV cameras have automatic control of the gain which allows them to
operate under changing illumination conditions. If systematic errors are
suppressed using error coefficients, this automatic gain control should
be switched off first.
Practical Experiment 4.A - VIP Version
-
You are calibrating a TV camera using an image with constant gray levels
of 128.
-
You may examine the output images using a new node, the Live_Image node
found in Nodes->Output->To Graphic Window. This node allows interaction
with the image, specifically the ability to 'grab' grey levels from the
output window.
-
Also, you will gain further insight into the problem by turning the
'Inhibit Byte Scaling' feature on and off in the Live_Image window. (To
access this feature, simply double-click on the displayed image) This feature
either does or does not scale the image over a discrete set of grey values
to enhance contrast (similar to the histogram equalization technique discussed
earlier).
-
The image that results from the image acquisition shows a severe degradation
caused by nonhomogeneous lighting (the image can be found at ~dip/examples/images/DigitizedTestImage.tif)
-
Generate the ideal image using VIP and derive the correction image,
assume multiplicative character of degradation.
-
(Hint: to generate a 256x256 image of constant grey-level, use Nodes->Input->Make_Data
and set output = Make_Array(256,256,VALUE=num) in the Properties box, where
num is the grey level you desire)
-
To prove that your correction works, another image was acquired using
the same camera and the same lighting conditions, this image is in ~dip/examples/images/Corrupted.tif
-
Using your correction image, correct the degradation and visually assess
its performance.
-
Now, determine the difference image between your corrected image and
the ideal image (undegraded original, ~dip/examples/images/sf.png).
Practical Experiment 4.A
- Khoros Version
-
You are calibrating a TV camera using an image with constant gray levels
of 128.
-
The image that results from the image acquisition shows a severe degradation
caused by nonhomogeneous lighting (the image can be found at ~dip/examples/images/DigitizedTestImage.kdf)
-
Generate the ideal image using Khoros and derive the correction image,
assume multiplicative character of degradation.
-
To prove that your correction works, another image was acquired using
the same camera and the same lighting conditions, this image is in ~dip/examples/images/Corrupted.kdf
-
Using your correction image, correct the degradation and visually assess
its performance.
-
Now, determine the difference image between your corrected image and
the ideal image (undegraded original, ~dip/images/sf.pgm) ... look at the
histogram of the difference image.
Grey scale transformation
-
Grey scale transformations do not depend on the position of the pixel in
the image.
-
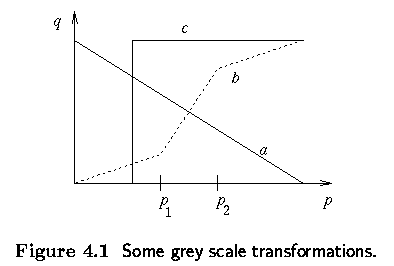
Brightness transform:

a - Negative transformation
b - contrast enhancement (between p1 and p2)
c - Brightness thresholding |
-
Grey scale transformations can be performed using look-up tables.
-
Grey scale transformations are mostly used if the result is viewed by a
human.
-
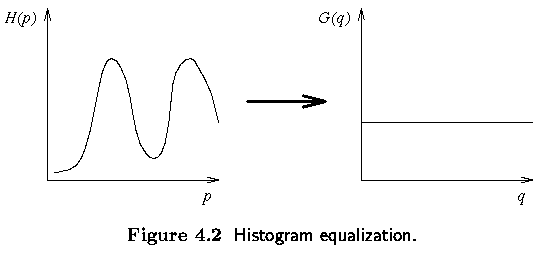
Typical grey level transform ... histogram equalization is usually found
automatically
-
The aim - image with equally distributed brightness levels over the whole
brightness scale


Links to histogram equalization web sites:
http://www.generation5.org/content/2004/histogramEqualization.asp
http://wwwcs.upb.de/cs/ag-domik/bildverarbeitung/bv-vl-ss00/histogram_equalization_example.htm
Practical Experiment 4.B - VIP Version
-
Display the image ~dip/examples/images/what_is_it.jpg
-
Can you recognize the person? Man or a woman?
-
Use the histogram.vip
and perform histogram equalization.
-
Can you recognize the person?
-
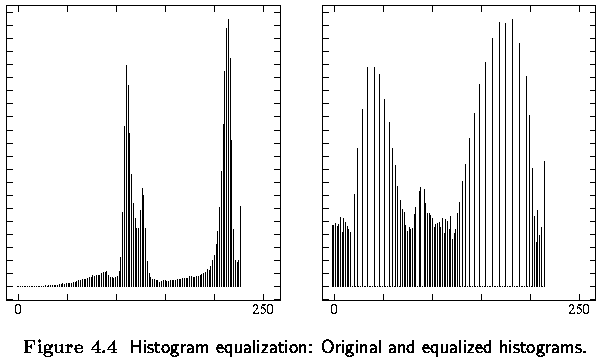
Display the histograms before and after equalization
Practical Experiment 4.B - Khoros Version
-
Display the image ~dip/examples/images.dir/what_is_it.kdf
-
Can you recognize the person? Man or a woman?
-
Use the histogram.wksp and perform histogram equalization.
-
Can you recognize the person?
-
Display the histograms before and after equalization
-
The histogram can be treated as a discrete probability density function,
look in the book for details.
-
The monotonic property of the transform T implies

[Back
one section] [Table
of Contents] [Next
Section]
Last Modified: September 8, 2003
![[Go Back]](next.gif)


